Thursday, February 9, 2012

Meal of the Week 13: Kale Chips

Snack Attack!!! How am I so late in discovering this vitamin filled amazingness??

So I totally burned my first batch and I undercooked the second, but I think the third time will be the charm.... if I can eat any more? (and I haven't even had dinner yet ooops).

Here's a link to the recipe I used:


I also used the pre-washed pre-cut ready to cook Kale from Trader Joe's so the time to make is LITERALLY cook time plus 1 min.

Yum. Just Yum. Thanks internet for another great recipe.

Monday, February 6, 2012

Baskets of groceries, bundles of fun

As my Sweet Pea gets more and more excited about copying everything I do, I’m trying to keep up with her interest and make fun toys to go along with her age.

Right now I’m in the middle of a big project to make a bunch of crocheted food items for her before we get her a play kitchen. We’re thinking to get her the kitchen (or DIY make one!) before Christmas next year so I’m not feeling stressed at and just taking my time.

Here’s the first round up on free patterns I’m using:


roundup - crochet foods

1. Sandwich from Yummi-Gurumi by Craft foxes

2. Cupcake by Anapaulaoli

3. Pancake Breakfast by the Craft Frog

4.Eggs by Easy Makes me Happy

5.Sausage links by tots and bottoms

6. Sweet Little Cake by KTB Designs.

Saturday, February 4, 2012

Meal of the Week 12: I Wish it Were Summer Salad

I must be late in discovering this, but did you know that bags of triple washed organic spinach leaves at Trader Joe’s are the same price or cheaper than regular spinach at other grocery stores??? OMG. How can I be so late to find this out?
Anyways, This is my all time favorite salad for the summer.. and since I wish it were summer, well… you know what I’m saying.
Ingredients: fresh spinach leaves, cut strawberries, chopped walnuts.
I like to top it with a balsamic vinaigrette, but you can dress it however you like!
DSC_0013
Simple, Easy, Yummy. Enjoy!

Friday, February 3, 2012

Crochet Hearts

I found this fabulous pattern to make crocheting festive for Valentine’s day and I wanted to share it!

image

The linked picture above give the pattern. SOOO easy. I’ve been making them while we watch tv at night. My husband thinks they’re cute. Here are the ones I’ve made:

DSC_0049

I’m going to hopefully have enough by valentine’s day to fill one of my vases (so my hubby won’t feel the need to spend bunches of cash on flowers that will die)

5 down…. 50 more to go!

Wednesday, February 1, 2012

Heart Wreath

I saw this:
image
on the idea room from a couple of years ago and decided to use what materials I had to make something similar.
So I took my pile of red t-shirts
DSC_0133
and a wire hanger
and cut out a bunch of circles… and then kept cutting out circles (I used 2 whole t-shirts and some scraps!)
DSC_0132
And then went crazy with my glue gun!
Here it is half done:
DSC_0135
I would stick some glue on it and then kind of squeeze the shirt scrap until it was the shape I wanted.
And several hours and at least 6 glue sticks later: Tada!
DSC_0041

Visit thecsiproject.com

Some V-day fun.

I’ve had bunches of fun this January trying to create some fun décor for valentine’s day. And here’s what I’ve come up with:

I have three projects that I’ve been working on. The easiest and most fun was my wire heart garland:

DSC_0030

I took wire – mine was copper, but and wire will do – you could even use green floral wire if you have a mind to mix up colors! – and wrapped it in circles then shapes into hearts. I made twelve of them, not caring what size they were. They all ended up about the same size, but varying thicknesses.

DSC_0037

Then I tied them to some ribbon and hung them up over my office area!

DSC_0045 (2)

And now the kitchen/office is just a little festive!

DSC_0036

Friday, January 27, 2012

Meal of the Week 11: The best potato soup ever

Um. Yes. I like this soup. That is all.
I have been in search of the perfect potato soup recipe for what seems like years. I read literally a dozen different recipes before combining them all into this one. It has been christened by husband as “the best soup ever”
Ingredients:
1 bunch leeks (or green onions, or scallions) – I use green onions because I like them best.
4 pieces of bacon – or more…
1 tbsp. butter
10-12 potatoes, peeled and diced
48oz. chicken broth
1 1/2 c. heavy cream
Salt & pepper
Minced parsley
Variations:
Substitute regular bacon for turkey bacon (but I used like 6 pieces of turkey bacon)
Use only 32oz of chicken broth for a thicker soup.
Cooking Instructions:
Cook bacon, cut off extra fat, and pat dry with paper towels. Chop into bacon bits.
In a large pot, add precooked bacon, and green onions. Cook in butter until soft. Add diced potatoes and chicken broth. Simmer for 40 minutes. Add cream, salt and pepper to taste (approx 1 1/2tsp salt and 1/2 tsp pepper). Sprinkle with minced parsley. (This soup may be whirled in a blender or smashed with a potato masher to make a puree). If it becomes too thick, add milk or broth.
I made this for the first time two weeks ago when I wanted to take a dear friend dinner. It was really good then. Then I made it again today a using the variations. 
DSC_0139Yes, please. I would eat the whole pot right now if I could.

Thursday, December 1, 2011

Organization: The Board

DSC_0001-1.NEF

So when I made this board I hadn’t intended to blog it, but after a request from a friend here it is:

 Supplies: old Corkboard or bulletin board
an old sheet or a couple of old white t-shirts
Staple Gun
Ribbon – 1/2 inch for the border, 1/4 inch for the interior sections and lattice
1 sheet of felt, or bulk felt cut to size
container (cut in half)
Freezer paper (for stencils)
cardstock or construction paper
magazine photos of household chores
thumb tacks – I used both flat tacks and knobby ones
paint/paint brushes
the glass from three old 4x6 frames
Planning:The first step is really to decide what you want. I needed 4 things:
1) a place to organize my weekly chores
2) a place for meal planning
3) a place for bills/mail that needs to be read
4) a place for notes and lists that usually clutter up my fridge

Cover the Cork Board:First, lay your sheet right side down on a flat surface. Place the cork board face down on the sheet. Measure about 4 inches out on each side and cut. Cover your cork board with your old sheet. Stretch and secure it to the back using your stapler or staple gun. Be sure to roll the rough edges under before stapling so the back isn’t crazy looking. Glue ribbon around the edges to create a nice border.
Measure:Marking only along the very edge of the board with chalk or a white sewing pencil, measure out the difference sections you want. For mine I used the following measurements:
4 inches for the date of the week letter
5 inches for the chore cards
4 inches for the meal planning
the rest of the board for everything else.
DSC_0003.NEF
Weekly chore cards:Using freezer paper and your cricut, slice, or other machine (or an exacto blade) cut your day letters. Mine were 2 1/2 inches tall. I cut a couple of letters in scrap paper first to make sure I had the sizing and spacing right before cutting the freezer paper.
Lay your freezer paper stencils on your sheet covered cork board and iron them on. Be careful with the spacing! Paint and let dry. Seal with the iron after they’re completely dry.
Cut 2x2 squares of paper and again using your cricut cut your chore words out (mine are 1/2 inch tall). Pop the letters out and glue on pictures of the chores if you want. I thought this made them look cuter and since cuteness was my goal… yeah. Then cover each square with shelving paper so they won’t tear. If you don’t have a cutting machine you can just write the chores on the cards or decorate however you want.
DSC_0004.NEF
Meal Planning:Glue ribbons on the board to separate this section from the top and bottom sections. Using flat thumb tacks attach your glass to the board. Three pieces from 4x6 frames were perfect for my board. Use like a dry erase board. Be careful when cleaning so you don’t stain the sheet or the ribbon.
DSC_0005-1.NEFDSC_0006-1.NEF
Bills:Take your container and cut it in half. Paint if necessary. (I used an old plastic laundry booster container and needed to cover up the label.) Use your imagination to attach them vertically on one side of your board. I wrapped a ribbon around the middle under the lip of mine and then stapled the ribbon to the board. I used hot glue to attach the corners, but that came up so best to stick with staples or maybe super glue.
DSC_0007-1.NEF
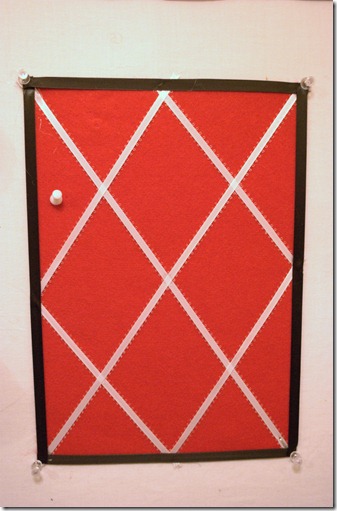
Lists/Notes:Take the sheet of felt and staple to the board on the other side from the bills area. Hot glue ribbons in a lattice formation so you won’t have to use thumb tacks if you don’t want to. Then hot glue ribbon around the edge to cover up the ends of the lattice ribbons.
Happy Organizing!