Monday, April 25, 2011

Meal of the Week 5: Rachel Ray's Chili Recipe

This week’s meal of the week is brought to us by my stand out favorite quick meals chef, Rachael Ray. Now I’m not really into talk shows, but if I wanted to watch one I would probably watch hers. It’s wholesome, focuses of food, occasionally shows fuzzy animals, and otherwise makes me chuckle. Really, I just think I like that she comes out of an elevator at the beginning. All that to say, this week’s recipe comes from yet another cook book that I have never made anything out of, Guy Food, One of RR’s Top 30 30 minute Meals books. So here goes:
Manly Manny’s Chili:
For this recipe you will need:
DSC_0021DSC_00252 T vegetable oil
1 large onion
4 cloves garlic
1 1/2 lbs ground sirloin 90% lean
Montreal Steak seasoning (or salt and pepper to taste)
1/2 bottle of beer (what are YOU going to do with the other half?)
14 oz Beef Broth
6 oz Tomato paste
1 1/2 T dark chili powder
1 T ground Cumin (yes! I have it this time!)
2 oz smoky BBQ sauce
2 oz hot sauce (about 3 T)
6 oz shredded smoked cheddar cheese
chopped raw onions optional
DSC_0026DSC_0027Start by heating the oil in a big pot over Med-Hi heat.
Sauté the onions and garlic for 3-5 min. 
Add Beef and brown it. (3-5 min)
Season with salt/pepper or Montreal steak seasoning. Add beer and let it reduce by half.
Stir in broth, paste, chili powder, cumin, BBQ sauce, and hot sauce. Reduce heat to Med-low and simmer for 10 min. Top with cheddar and onions. Serve with or over corn chips. (Although we really like corn bread and a pack of jiffy corn muffin mix is like $0.50 versus the $2 for a bag of cheap chips – pick your fave or what ever your budget can afford.)
The key to the amazing pictures is always keeping the baby busy while the food is cooking. I find I have better luck with great pictures when the whole house is about to erupt in chaos. So like right now: the babyDSC_0016DSC_0017 is screaming and the dog needs to go out.. oh and my husband is calling on the phone. Time to take a quick snapshot of the boiling chili mmmmmm.
DSC_0029
Ok, so really folks, the only Chili I’ve ever seen that has no beans in it is Wendy’s chili. (Although a pot of it did win the chili cook-off at a church picnic I was at years ago.) However, because my husband got really excited about the fact that there were no beans since he doesn’t care for beans, We had salad on the side, but if you’re more inclined to eat your veggies hot you can always chop a green pepper and put it into the chili. Which brings us to the rest of my substitutions. I didn’t feel like paying an arm and a leg for “smoked” cheddar cheese, so I bought what was on sale, sharp cheddar cheese. I know it won’t taste the same but it should be ok. I also used “honey BBq sauce” instead of “Smoky BBQ sauce” because that’s what we had. No substitutes for cumin this time because… drum roll please… I actually bought some!! Go ahead, send up a cheer. And that’s it! It was Oooooh so Yummy!
Happy Eats!

Thursday, April 14, 2011

Meal of the Week 4: Spinach Quiche

Brinner! Everyone, at least in my house, LOVES brinner. I try not to fix it too often because then we get spoiled, but for the last two weeks brinner has just been on my mind. Last week it was french toast with a side of scrambled eggs and this week’s hankering for breakfast food in the pm is bringing us the meal of the week.
Crust-less Spinach Quiche
For this recipe you will need:
DSC_0029 (2)
3 ounces reduced fat cream cheese, softened

1 cup fat-free milk
4 eggs
1/4 teaspoon pepper
3 cups shredded reduced-fat Cheddar cheese
1 (10 ounce) package frozen chopped spinach, thawed and squeezed dry
1 cup frozen chopped broccoli, thawed and well drained
1 small onion, finely chopped
1/2 package of presliced fresh mushrooms
This is so easy it makes me smiles just thinking about it!!
In a large mixing bowl beat together the cream cheese, milk, eggs and pepper until smooth.
DSC_0031 (2)
Stir in remaining ingredients with a fork. Tip into a pan of your choice, my 8x13 Pyrex worked great – or you could put it into an actual quiche pan if you have one (I don’t….).
DSC_0033 (2)
Bake at 350 degrees F for 45-50 minutes or until a knife inserted near the center comes out clean.
My substitutions:
This recipe is SOOOOooooooooo awesome because you can put whatever you want into it! If you want to add bacon bits, do it! If you want to add ham, do it! If you want to add more veggies, do it! Just make sure that you really do squeeze the spinach dry and drain any water from the veggies you add. I might add a little fresh garlic next time and maybe a little more pepper, but that’s what I love about this basic quiche recipe, you can play with it however you want!
This was so yummy, I can’t wait to eat the leftovers!
Happy Brinner!!

Tuesday, April 12, 2011

Tea Towel Dress

Have I mentioned that my sewing machine is a piece o’ junk? It took me all day to figure out why the tension was messing up (a key to this AWESOME easy dress) but I finally figured it out!!! I’m so excited.
I used to have a dress like this, but I think mine was maroon, or maybe it was yellow? Anyways, I remember thinking it was soooo comfy. I can’t wait to see how Sweet Pea looks in this fabulous dress!
 217491_10150151982721547_534516546_6653343_5434446_n
Note: The tutorial I’m linking doesn’t say to use normal thread for the top thread, but you do. ALSO, if you have issues with your bobbin tension the shirring will NOT work. I learned this the hard way. Luckily, I also found great tips for fixing my bobbin tension and I shouldn’t have that problem any more!!! Hooray!!
You will all LOVE THIS TUTORIAL.
Happy Dress Making!!

Thursday, April 7, 2011

Organza Flowers

I take no credit for this craft idea. Actually I have no idea where it came from, but a friend of mine showed me how to make these a couple of months back and just this week my husband asked me if I would make some for our Sweet Pea. How cool that my husband is actually asking me to make something specific next!
<3. He’s awesome. I should make something for him next….

On to the craft!

DSC_0009

For this activity you will need:
about an 1/8th of a yard of your choice color of organza.
A needle and thread
3-5 tiny beads.
Oh yeah… you need scissors too. Smile

Start by cutting out 3-4 circles of different sizes from the organza. No need to be exact. We’ll smooth out the edges in a minute. In fact, sometimes a bumpy circle makes a cool flower. I just did circles because I didn’t feel like being overly interesting. If you try it with a bumpy circle, I’d love to hear how it turns out!

DSC_0011

** This is NOT a kid friendly activity, so make your all your bitty ones are napping or playing elsewhere while you craft!!***

Light your favorite candle. I like one with a scent, but if your sensitive, the scent is only for pleasure and in no way related to the craft.

DSC_0014

Carefully melt the edges of each piece of organza by moving it slowly in and out of the flame. You’ll start to see the edges curl up. Be careful that you don’t melt the edges too much. After you try it a couple of times you’ll start to see how much is too much and how much is just right. It all comes down to your personal preference.

DSC_0018

Layer the the pieces together so that they create a flower.

DSC_0024

Using the needle and thread, run a stitch through all the pieces of fabric. Run the needle through a bead to string it into the stitch.

DSC_0030

When you finish your stitch, try to insert the needle as close to the thread as possible so that your stitches don’t show.

DSC_0033

Repeat for 3 – 5 beads.

DSC_0036DSC_0040

Sew onto your favorite hair band or a round of hosiery (they work great for baby headbands!) and voila!

Here’s hoping that April showers bring more May flowers your way. Happy Crafting!

Tuesday, April 5, 2011

Dessert 1!

This week’s meal of the week is actually dessert! I love dessert and certain desserts remind me so much of my childhood. This is one of the best memories and a super tasty treat that you could almost count as healthy! I had to ask my mom for this recipe because its not one in a cookbook that I own. Humorously, when she pulled out her recipe to email it to me she found that whatever marker she had originally written it down in had blurred over the years. The runny green marker recipe card didn’t yeild much help, but, because my mom is BRILLIANT, she found a similar recipe online for me. So, while I’d like to say this recipe is my mom’s… its actually from cooks.com (Read more about it at www.cooks.com/rec/view/0,186,158186-233200,00.html Content Copyright © 2011 Cooks.com - All rights reserved.) with my mom’s modifications. We found it quite tasty. I hope you enjoy it!
Butterscotch Apple Cake
Today’s ingredients: All the basics for cookies plus a few extras SmileDSC_0056
Beat together: (I don’t have an electric mixer, but mixing with a fork worked just fine)
2 c. sugar (I only used 1 1/2 C)
1 c. cooking oil + 2 tbsp. oil 
3 eggs
1 tsp. each cinnamon and vanilla (could probably use a little more cinnamon. I found it a bit lacking on the spice)
DSC_0058
Mix dry ingredients and add:
2 1/2 c. flour
2 tsp. baking powder
1 tsp. baking soda
1 tsp. salt (scant)
DSC_0059
And now for the best two ingredients:
APPLES
DSC_0064
and Butterscotch chips… mmmmmm
DSC_0063
Fold in 3 cups diced apples.
We had a little issue while cutting the apples… my chopper didn’t like the idea of tough apple skin…DSC_0066
But it turned out ok...DSC_0068
(Remember that I folded in the Apples AND the Butterscotch chips. so if you’re following my mods, skip the last step below)
DSC_0073
Pour into greased and floured oblong pan.
DSC_0074Sprinkle 1 package (6 ounce) butterscotch chips over top of cake batter.
Bake at 350 degrees approximately 45 minutes.
My mom’s modifications:
I highly suggest using these mods as the result was basically awesome. I used only 1 1/2 cups of sugar – and I probably could have used less. Because of the butterscotch chips and the apples, the cake would be WAY too sweet if you actually used the whole 2 cups of sugar. Next time I’ll probably only use 1 cup and maybe use some apple sauce as well. I wish I had added more cinnamon – 1 tsp would have added more spice!! (I like spice). I also used whole wheat flour instead of white flour (mostly because I didn’t have any white flour… shhhhhhh! don’t tell anyone) but actually using whole wheat flour is exactly what my mom used to do! It would have also been fluffier (it was pretty dense on tast testing) if I has used more flour. Probably a 1/2 cup extra would have been nice. I also folded in the butterscotch chips instead of putting them on top (that’s the way momma always did it!) A 9x13 pan works perfectly.
Watch out for snacking kids with this one! Happy Eats!

P.S. Mom email me this morning. Said she probably peeled the apples. It tastes amazing either way, but peeling the apples definitely makes chopping easier... :-)

Thursday, March 31, 2011

Thrifty Thursday!

You all know how much I love a good deal. Well, I wanted to brag. Last week we went out on a date (dinner AND a movie) for under $20. I know.

THAT’S CRAZY TALK!!!

You are now all asking,
<How did you do it???>

And if you weren’t, you are now. <Hah, I’ve got ya now!>

Well, as much as we all hate SPAM emails and advertisements that come in the mail. I went ahead and signed up for almost every deal site I could find. (Yes, that’s a lot of emails that I just delete every day) These deal sites can either help you have a good time and still make budget, OR they can very easily cause you to bust your budget wide open. I suggest signing up with caution, purchasing after much careful consideration with your spouse, and making sure that you use it before it expires.

So, the story begins:
A couple of weeks ago, livingsocial.com had a deal for 2 fandango tickets for $9 (that’s less than the price of one ticket here in Seattle).
Now. you can see where this is going…

Did I mention that the movie we went to see started AT 7pm…. which is also Bitty Bear’s bedtime goes to sleep? So how did we get dinner out, (for less than $11) without going drive through? Ok, and this is where I become criminal. We snuck food into the theater. A whole pizza. In plastic ware. And napkins. And soda. and we cooked it ourselves (ok, you caught me, it was a frozen pizza, but it doesn’t have to be!). It would have been even better if I’d remembered paper plates.And we were early!! I still can’t believe we made it in time. This is the part that takes planning and makes the date more fun. And if you have older kids, you can make the pizza with them before the babysitter arrives so that you will have spent some quality time with your kids and your spouse before you go stare at a huge screen for 2 hours.
Smile

3 key components to this date that may or may not be reproducible: my Bitty Bear skipped her nap that afternoon and was PASSED OUT at 6:15 pm. We have awesome friends who will babysit for free. This is essential for the $20 date. Otherwise, you’ll shell our $20 alone for the babysitter!! And lastly, I have a big purse. Don’t try sneaking food into the theater if you have a small purse. That’s just awkward.

So there you go. A thrifty date that was lots of fun, thrilling (come one, you know that sneaking food into the theater is something that you loved doing in college but can’t bring yourself to do now that you have a full time job), and didn’t break the budget.

What have you done this week to keep it cheap?

Wednesday, March 30, 2011

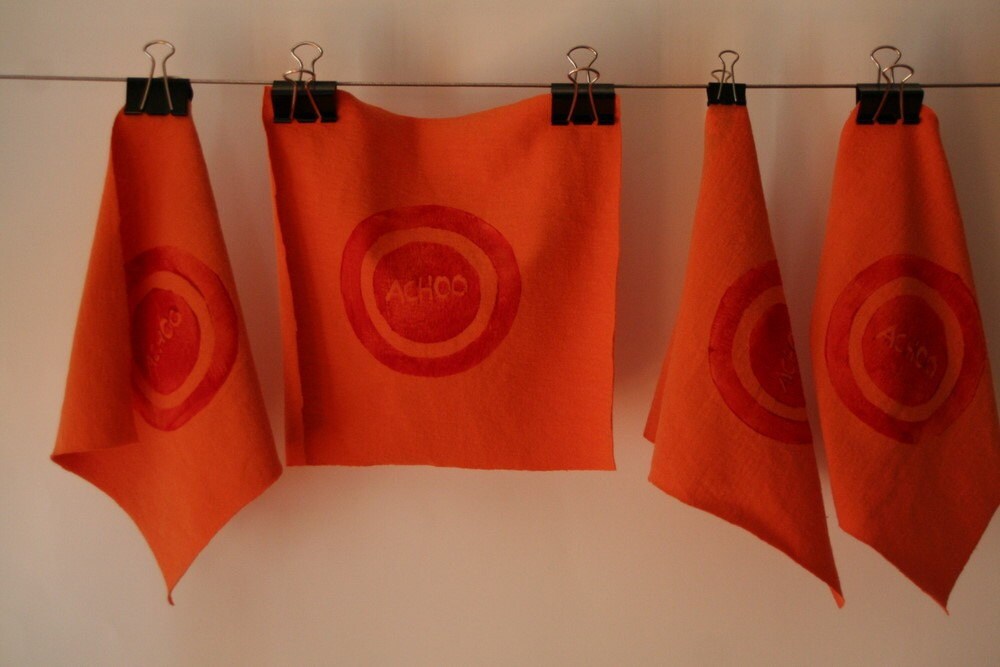
Achoo!!!

We've had a bad case of the sniffles this week that just don't want to quit! Since we've been out of commission and unable to be crafty ourselves, this week's craftiness is brought to you by my friend Bekah's  Etsy Shop. She's a genious when it comes to upcycling!
I think this is such a perfect (and fun!) way to teach your kids how to cover their mouths when they sneeze.

Tuesday, March 29, 2011

Meal of the Week 3: Salmon Steaks

Strawberry Salsa and Salmon Steaks!
This week’s meal is brought to us by none other than the handy-dandy Better Homes and Gardens New Cook Book. Imagine that? The big old cook book that’s just been sitting collecting dust on your shelf while you scour the internet for another tasty recipe actually has some good eats in it!
For this recipe you will need:
2 Salmon steaks
2 avocados, pitted and peeled (about 1 cup)
2 C of strawberries (preferably overripe) chopped
1/2 C chopped seeded cucumber
2 T honey
1 tsp finely shredded lime peel and
2 T juice of a lime
1 jalapeno pepper, seeded, finely chopped (be careful! they’re nasty in the eyes!)
1/4 tsp cracked black pepper
DSC_0051DSC_0053DSC_0038
Combine all the salsa ingredients. Make sure they’re chopped to your preference consistency. Chill in the fridge for up to 24 hrs.
For a plain salmon (and to experience the salsa most exquisitely) try this baking option:
On a large sheet of tinfoil, dress your salmon steaks (or in my case, fillets) with the salsa. Roll up the foil around the steak. and bake in the oven at 450 for about 20 minutes. Salmon doesn’t have to be cooked through, so use a meat thermometer to check for doneness. I like mine medium well.
DSC_0066For a more luxurious salmon (which is also a little less healthy) Try this pan frying option:
Mix 1/4 C honey, 1 T chili powder, 1 clove of pressed garlic, and 1 T olive oil in a small bowl.
DSC_0075
With the heat set to Med/High, pour a little olive oil in a skillet and place salmon steaks/fillets on the skillet skin side up. After about a minute, flip the fillets. Once they are almost cooked through, spoon the honey/chili powder mix over top of the fillets. Lower the heat to Low and continue spooning the mixture as it boils from the pan over the fillets as it becomes a glaze like syrup. Serve immediately.
DSC_0093
My Substitutions: First off, I’m just not ready to handle a fresh jalapeno. So instead we just put some Texas Pete’s in the salsa mix. For extra bulk and spice and because I felt like it, I added a small onion. After tasting the mix with the salmon, I’m actually going to recommend that you stick with the base recipe. the onion added too much bulk and the lack of jalapeno made the salsa a little too sweet. It was still good! … it just would have been better if I’d stuck to the recipe.
DSC_0055For chopping convenience I used my Vidalia chop wizard – I love it!! It makes chopping fast, clean, AND!!! it will measure the amount you have chopped for you!!! No more estimating!!

For sides try a nice fresh salad, a side of orzo with lemon juice, olive oil, sea salt and fresh cracked pepper, or some tortilla chips so you can finish off the rest of your salsa.
Next week we’ll try a butterscotch apple cake. Happy Eats!
And we're linking up to these fabulous parties!

Wednesday, March 23, 2011

A Tag-rific Tutorial

You know how you see something in a store and think to yourself, “Dude! I can totally make that!” Well, this is one that I’ve been itching to try since I got the idea in my head a couple of months ago. The first version didn’t turn out perfectly (I am a novice sewer at best) and so I think I’ll try again in a couple of days.
DSC_0100First things first, for this little doozy you’ll need lots of scraps – scrap fabric, scrap ribbon, and an empty wrapper from either your baby’s favorite disposable diapers or your wipes refill pack. I used a wipes refill pack. The plastic from it is actually enough to make two or three, depending on the size.
After you’ve gotten everything together, cut your fabric into two even sized pieces. I picked a square but this can easily be done as a circle, triangle, rectangle… heck, even a rhombus would do nicely. Then measure the plastic and cut it to about the same size.
DSC_0104Cut your ribbon into random sizes and pin it to the right side of your fabric so that the loops point inward.  Don’t make the loops too long – about 4 inches of ribbon is plenty long enough when made into a loop. I think I made some of my “tags” too long. When I give it to Bitty Bear tomorrow I’ll see if she tries to put the whole thing in her mouth or not. (I suppose this goes with all toys, but please make sure your children are supervised when playing with this one)
With the right sides facing each other, layer your pieces so that when you turn the rights sides out at the end, the plastic will be in the middle. I put the plastic on the bottom when I went to sew it together. You can just as easily sew the inside seem with the plastic as the top layer. Make sure all the loops point in!!!DSC_0105
Sew around the edge leaving a small gap for turning. Remove the pins and turn the toy right side out (plastic will now be in the middle). Sew a finishing edge around it and you’re done!! Congrats! In about 1/2 an hour you made your babe a new toy!
Happy Sewing!
We're linking up to these linky parties

Tuesday, March 22, 2011

Meal of the Week 2: Ramsay's Ratatouille

Ratatouille?

I’ve been told that without Eggplant its not really Ratatouille. Well, this week’s meal of the week features A Gordon Ramsay version of Ratatouille that lacked eggplant. Why? Well, something happened with the weather and the eggplants didn’t make it to the stores this week. Literally there was exactly ONE eggplant in the whole store and they wanted to charge me 6 bucks for it.
Really? $6 for an eggplant? Mmmm, I think I can do without. So here goes:
Baked Eggs with Ratatouille
Step 1: Make sure the Baby is entertained by the puppy:
 

Step 2: Make Dinner!
For this recipe you will need:
1 Sweet Green Pepper
1 Sweet Red Pepper
1 Red Onion
1 small eggplant
1 zuccini
2 cloves Garlic, chopped
1 can chopped tomatoes (10oz)
4 eggs
1 tsp ground Cumin
1 tsp ground sweet paprika
4-5 Tbsp of Olive Oil
Sea Salt and Ground Pepper
4 oven safe dishes
(This is my approximation of what the actual recipe book says:)
Chop the veggies and place in separate bowls.


Add the olive oil and the onion to a pan and sauté for a couple of minutes. Add the peppers and garlic. Sauté for one to two minutes. Add the zucchini and eggplant continue to allow the vegetables to simmer in the pan for another 1-2 minutes. Add the tomatoes, paprika, and cumin. Cover and simmer for 10 minutes.Divide the Ratatouille between the four dishes and place on a cookie pan. Make an indention with a spoon and crack an egg into each of the four dishes. Sprinkle a little salt and pepper over each egg. Bake at 400 for 10-15 minutes or until the whites of the egg are hard. The yolks will still be a little runny.

My substitutions:
So we didn’t use an eggplant, because we didn’t have one and we didn’t have cumin either… so I used a little taragon and a little ground coriander as a substitute. I’m sure it would taste a little different with the eggplant and cumin and maybe next time I’ll use them. On the other hand, it was pretty good for dinner and we saved the extra two servings for lunch and it was still good reheated for lunch too.
 Next week we'll try a strawberry salsa on salmon fillets MMmmmmm.
Enjoy!